Summer garden 2014

The first Summer after we moved here, I tried to grow a few things like bell peppers and lettuce.  Things didn’t do very well – the peppers got beetles in them and I don’t think the lettuce ever did very well.  Part of the problem was that back then, I wasn’t on any medication to help control various things like the constant heavy bleeding, the PCOS and its various symptoms, the fibromyalgia pain… so some days, I wouldn’t even have the energy to get outside to water or check on things.  Back then, Bryan wasn’t very into gardening either (he still doesn’t love it, but he seems to be getting into at least helping me with my garden).

I pine for seeds and plants, raised beds, the act of growing my own herbs and food.  It’s actually an ache I experience every year – to get outside and plant things and watch them grow.  So this year, Bryan actually got behind my desire to have a vegetable garden.  I bought my pots and grow bags, seeds, soil, vegetable starts, and everything else I knew I’d need.  I had the same fear he did – that at some point, my energy would fade and I’d lose interest or just neglect the garden, thus letting it die and wasting everything.  But I also knew that the Cymbalta, tramadol, and progesterone I’m on, medications that help control all the symptoms I experience, plus taking a daily vitamin pack, would help.  Ever since starting on cycled progesterone, things in the female department have been a lot more reliable.  No more months of heavy bleeding and cramps.  Now, it’s under a week and is relatively light compared to before… the Vitex I take helps a lot in the heaviness department.

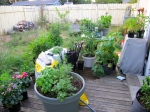
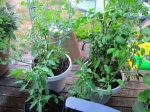
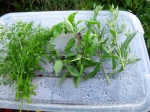
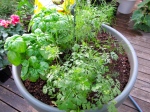
So I started some seeds back in May – various herbs, a bunch of heirloom tomatoes, peppers, and a few other things.  I admit, it was ambitious, but that’s how I get with this stuff – I want to grow way more than I have space for!  BUT… you know what?  I made it work.  I planted every one of my 10 heirloom tomato plants and all my herbs.  The peppers are still pretty small – even the ones I transplanted and the ones that were starts.  They just never seem to grow well up here.  But everything else is doing so well.  Our zucchini is almost ready to harvest, our pickling cucumber plants have tons of fruit growing plus even more blossoms (and the bees seem to love it).  Our tomato plants are covered in blossoms and a few are growing fruit that should be ready in about a week, maybe two.  Our two huge herb planters are filled out with herbs like dill, basil, thai basil, tarragon, cilantro, mint (!  the mint has taken over), and sage with newly planted chives and parsley growing.

Here are some pictures we took last week for a contest for the company from which I get my seeds, Seedsnow.com:


Easiest method for chopping eggs for egg salad

Let’s face it, we all have those one-job tools and gadgets in the kitchen. Isn’t it nice when we figure out another way to use them, especially when it makes a difficult job easier? Well, a few years ago, I was about to chop some eggs for egg salad using a fork like I usually do. That method can be really tough on hands, especially if you have any kind of issue like carpal tunnel or arthritis like I do. I’m not even sure how the idea came to me, but there it was… My trusty OXO pastry blender. It could cut cold butter into flour, so why not soft eggs? I just basically started pushing down on my bowl of hard boiled eggs and got slices… Kept kind of mashing and twisting and within seconds, I had a nice medium-fine chop. A good, sturdy pastry blender is a must, though! Some of the ones I’ve seen are nothing more than 12-14g wire, which bends too easily. The OXO blender uses blades and cleaning it is very easy. Just make sure you wash it right away or you’ll have dried-on egg stuck to it, which is a pain to remove without a long soaking.

20140526-183450-66890162.jpg

20140526-183633-66993357.jpg

20140526-183450-66890616.jpg

Spaghetti with lemon cream sauce

For some reason, I’ve been in a creamy pasta mood lately. Maybe I’ve been needing comfort food, maybe it’s just a phase, or maybe it’s seeing everyone’s Pinterest posts about creamy pasta. Who knows? In any case, I wanted something to go with our salmon fillets for dinner tonight, so I perused my Cooks Illustrated pasta cookbook and came across a simple dish of fettuccine with lemon cream sauce. We don’t typically have fettuccine, but spaghetti worked just fine. The finished dish was more than I could ever hoped for. Creamy and decadent, yet light at the same time. It went perfectly with our pan-seared salmon and steamed broccoli with butter and lemon zest (left over from the pasta dish).

Spaghetti with Lemon Cream Sauce

1 pound of dried spaghetti
1 1/3 cup plus 1/3 cup heavy cream
5 tablespoons butter
1/4 cup fresh lemon juice
1 cup finely grated Parmesan cheese (do yourself a favor and get the good stuff), lightly packed
2 teaspoons lemon zest
Salt
Pepper

In a large 6 quart pot, bring water and 1 tablespoon salt to a rolling boil. Cook pasta to al dente (or preferred tenderness) and drain. Reserve 1/2 cup pasta water to thin sauce as needed (we didn’t need it).

Meanwhile, in a pot large enough to accommodate pasta, heat 1 1/3 cup cream, butter, and lemon juice over medium heat until cream just starts to simmer. Turn off heat.

Add drained pasta to sauce and add remaining 1/3 cup cream, cheese, lemon zest, and 1/2 teaspoon salt. Agitate pasta using a pasta spoon or tongs and cook over low heat until sauce has thickened slightly and pasta is coated. Serve immediately.

Notes: This dish goes well with any firm fish or perhaps thinly pounded chicken breasts that have been lightly coated in flour and sautéed in olive oil or butter. Broccoli, asparagus, or any other vegetable that goes well with lemon works, too. The pasta alone was delicious enough and could easily be a meal by itself.

Hamburger Helper-style Beef (or meatless) Stroganoff

I first tried this recipe when I had a few pounds of meat I had ground up after realizing the cut of beef I bought wasn’t useful for very much.  It was an eye round roast from Costco and we had tried making roast beef with it, but it didn’t turn out very well.  So I rough-ground it to use in chili or other recipes that called for ground beef.  I like the ease of Hamburger Helper, but really hate the junk that’s in it and the amount of salt.  So a homemade version is perfect for a quick dinner.  There are other skillet meals similar to this one out there, but this one has become a favorite.  The original recipe didn’t include onions, only 4(!) mushrooms, and no mustard powder.  I think this one’s a bit better, but you can easily customize it to your liking.  We’ve also made this using Gardein meatless crumbles and it’s really good, too.

Hamburger Helper-style Beef Stroganoff

Ingredients

8 ounces white or crimini mushrooms
1 medium onion, halved and sliced (optional)
1 teaspoon olive oil
1 lb ground beef or meatless crumbles
8 ounces wide egg noodles
2 cups milk
1 1/2 cups hot water or beef stock
1 teaspoon Better than Bouillon Beef Base (omit if using beef stock)
1 tablespoon cornstarch
1 teaspoon salt
1/4 teaspoon black pepper
1/4 teaspoon paprika
1/4-1/2 teaspoon dry mustard, optional
2/3 cup sour cream

Directions

1. Heat a large skillet over medium-high heat. Add the olive oil and brown the mushrooms. Remove to a bowl and set aside.

2. Add the ground beef and onions, if using, and brown. Bring back to medium high heat and add the noodles, milk, beef stock, mushrooms, cornstarch, salt, pepper, paprika, and dry mustard, if using. Stir to combine and cover.

3. Lower the heat to medium and allow to simmer for 10-15 minutes, or until the noodles are cooked through.

4. Add the sour cream and simmer for 5 more minutes. Serve immediately.

Light Wheat Bread

I apologize for the lengthy break. I was dealing with some health issues (mainly, just emotionally gearing up for my appointments with my doctors) and then began working on Christmas projects. I’ve gotten a ton of things done this year and even managed to send out Holiday cards. Yay me!

Now that I’m (mostly) done with gift-making, sending, and wrapping, I’m hoping to post a bit more about what I’ve been doing. But for now, I’ll tide you over with one of my favorite bread recipes – Light Wheat Bread. It’s a 40% whole wheat bread, but I’m really hoping to eventually make it 100% whole wheat, maybe even with some bran worked in there for extra fiber.

My recipe comes by way of one of my favorite food blogs, Smitten Kitchen, and she gets her recipe from The Bread Baker’s Apprentice, one of Peter Reinhard’s books… Which I actually have somewhere. She bakes hers for upwards of 45 minutes to an hour, but mine is consistently done at 35 minutes, so it pays to use an instant-read thermometer here.

It’s also very, very similar (almost exactly so) to my favorite white sandwich bread from King Arthur Flour, Walter Sands’ Favorite Bread. It has all the same ingredients, though the wheat bread has less honey, which is ok with me. I never did like those sweeter honey wheat breads that most seem to prefer. By the way, if you generally prefer white bread, you can’t go wrong with this recipe. It’s light, fluffy, Wonderbread-like bread.

So without further ado…

~ Makes one 9″x5″ loaf, can be doubled (if you use a mixer)
~ Instructions are for a bread machine for mixing, finishing by hand and baking in the oven. But, here is a link to the original recipe if you want to use a stand mixer or mix by hand.
~ I very, very strongly advise you to get yourself a kitchen scale. It makes baking and, specifically, bread making MUCH more precise. That’s a good thing when using a bread machine because you know the recipe will work every time. I never have to check the dough for this recipe.

ingredients
2 1/2 cups (11.25 oz) unbleached bread flour
1 1/2 cups (6.75 oz.) whole-wheat flour (I use Bob’s Red Mill)
1 1/2 tablespoons (.75 oz.) granulated sugar or honey (I use honey)
1 1/2 teaspoons (.38 oz.) salt
3 tablespoons (1 oz.) powdered milk (I use Nido, a whole milk powder from Nestle)
1 1/2 teaspoons (.17 oz.) instant yeast
2 tablespoons (1 oz.) shortening or unsalted butter, at room temperature
1 1/4 cups (10 oz.) water, at room temperature

1. Place ingredients in bread machine pan according to machine’s instructions. Usually, it’s liquids first, then salt and other dry ingredients with flour coming last. Make a divot in the flour and add your yeast. You just want to ensure the yeast doesn’t touch the salt or water until the machine begins mixing.

2. Place the pan into your machine and set it for the “dough” cycle.

3. Once the cycle is complete (1.5 hours on my machine), remove the risen dough from the pan and dump onto a counter sprayed with cooking spray or lightly oiled. Do NOT flour the counter! Pat the dough into a rectangle about 6-7″ wide and 8-10″ long. Roll up dough tightly starting with a short side. Pinch the seams of the dough closed. You can choose to pinch side seams closed or not. It won’t really affect baking too much, but you may get a spiral pattern on the sides if you don’t. If so, use the sides of your hands to karate-chop the side seams closed, then tuck under. Place bread seam side down in a greased/sprayed 9″x5″ bread pan. Spray top lightly with oil and cover with plastic wrap. Set bread in a warm place to rise until doubled, anywhere from 45 minutes to over an hour, depending on how warm your kitchen is.

4. When you see the dough just cresting the pan, heat your oven to 350. It should have a good 15-20 minutes to fully heat up. Let dough continue rising until it’s an inch above the pan. Remove plastic wrap and place in center of the oven. Bake for 30-35 minutes or until thermometer reads 190. Remove bread from oven and turn out of pan onto a cooling rack. Let cool for at least an hour.

5. Once cool, slice with a bread knife and enjoy either plain, with butter, toasted, on sandwiches, etc. this is a great all-around bread. It would also be great for dinner rolls, but that’s another post.

Two Cookies

I guess I was just in a cookie baking mood yesterday. I was making cookies for a M:TG game Bryan was going to tonight and ended up having a couple over for preparation for that game. Bryan has an interview with WotC (Wizards of the Coast, the makers of Magic) this week, so he’s brushing up on the game in preparation. Anyway, I ended up baking tons of cookies – three types in all – and I have two of the recipes for you today.

The fist cookie was one that Bryan says is his favorite cookie I’ve ever made even though he doesn’t like coconut – and it’s full of coconut. Last year, when he was still working for Zombie, we bought a huge container of coconut oil at Costco and I was scouring the internet for recipes for baked goods that used coconut oil. It’s an extremely healthful oil despite the saturated fat in it – and no, it doesn’t smell like suntan lotion. It has a faint coconut smell to it, but you can’t really taste much of it in the finished product. It’s what they use in most movie theater popcorn, albeit butter flavored, and is great for all kinds of things – even as a body oil.

The second cookie is something I specifically looked up just so I could use some of my cranberries and white chocolate chips. I love oatmeal cookies, especially ones with unique add-ins – stuff other than raisins and nuts. I found a recipe that looked promising and they turned out well.

Chewy Coconut Oatmeal Cookies with Coconut Oil
Adapted from Two Peas and Their Pod
Yield: lots of cookies!

Ingredients:
2 3/4 cups all-purpose flour
1 teaspoon baking soda
1 teaspoon baking powder
1/2 teaspoon salt
1 cup granulated sugar
1 cup brown sugar
2 large eggs
1 cup coconut oil, slightly softened like room temperature butter
2 teaspoons vanilla extract
1 cup shredded desiccated coconut (see resources)
1 cup old fashionedoats

Directions:
1. Preheat the oven to 350 degrees. Line a large baking sheet with parchment paper and set aside.

2. In a large bowl, combine flour, baking soda, baking powder, and salt. Set aside.

3. In a stand mixer, cream together the sugar, eggs, coconut oil and vanilla extract until light and fluffy. Slowly add the dry ingredients and mix until combined. Stir in the oatmeal and coconut.

4. With a medium-sized cookie scoop, portion out dough onto cookie sheets, spacing two inches apart. Bake at 350 degrees for 12 minutes, or until the cookies are set and slightly browned. Let the cookies cool on the baking sheet for 2 minutes. Transfer to a wire cooling rack and cool completely.

White Chocolate-Cranberry Oatmeal Cookies
From Two Peas and Their Pod
Yield: about 2 1/2 dozen cookies

Ingredients
1 1/4 cups all-purpose flour
1/4 teaspoon salt
1/2 teaspoon baking powder
1/2 teaspoon baking soda
1/2 cup brown sugar
1/2 cup granulated sugar
1/2 cup unsalted butter, at room temperature
1 large egg
1 teaspoon vanilla extract
1 1/4 cups old fashioned oats
1 cup of dried cranberries
1 cup white chocolate chips

Directions
1. Preheat the oven to 375 degrees F. Line a large baking sheet with parchment paper and set aside.

2. In a medium bowl, combine the flour, salt, baking powder, and baking soda. Set aside.

3. In a stand mixer, beat the butter and sugars together until thoroughly combined. Mix in the egg and vanilla. Slowly add the dry ingredients. Mix until just combined. Stir in the oats, dried cranberries, and white chocolate chips.

4. Using a one medium-sized cookie scoop (see resources, below), portion dough into balls and place on prepared cookie sheet. Bake for 12 minutes or until light golden brown. Don’t overbake! Let cookies sit on the baking sheet for two minutes. Transfer to a cooling rack and cool completely.

Resources
1. Shredded, unsweetened coconut (desiccated coconut) – Bob’s Red Mill on Amazon, $14.36 for 4 12oz. Bags
1. Medium (one and a half tablespoon) sized cookie scoop – OXO on Amazon, $13.99

Felicity Wrap Project

I’ve been crocheting up a storm lately. For some reason, my hands seem to be doing a little better. They still go numb and cramp a bit, but I don’t have the lingering pain I had before. They’re stiff when I wake up, but it wears off after awhile. I like to crochet in bed while watching shows on the iPad and I’ve got a huge stash of yarn and tons of projects I’ve been wanting to make.

My latest one is the Felicity Wrap by Robyn Chachula featured in the Nov/Dec 2013 issue of Crochet Today! magazine. The moment I saw it, I knew I wanted to make it. It has a very vintage look to it, especially in the ivory yarn shown. Now I just need to figure out whom to give it to for Christmas.

While I can’t post the pattern, I can show you the finished project. It turned out better than I thought it would. This was the first time I relied mostly on a stitch diagram and let me tell you…I LOVE working with them. They make it so much easier to understand where stitches go and how things fit together. I don’t think I could have finished it without the diagram.

20131102-025643.jpg

20131102-025652.jpg

20131102-025657.jpg

Cranberry Orange Cornmeal Cake

20131026-202915.jpg

A few weeks ago, I had my husband buy some cornmeal at the store only to find out later that I already had a mason jar full of it. So I’ve been thinking of some ways I can use it up beyond making plain old cornbread. Don’t get me wrong, sweet cornbread is great, but you can only eat so much of it.

I was initially thinking about making cornmeal pancakes. I love the flavor of corn and I haven’t made cornmeal pancakes in awhile. However, I then remembered that I had seen cornmeal cake before – not cornbread, but actual sweet cakes made with cornmeal. I did some Googling and came across one that looked especially good and contained cranberries, which I also have in abundance. I also have some pithy, dry cara cara oranges that are no good for eating, so I could use those without wasting much. I couldn’t wait for the cake to cool, so we dug into the hot cake right after I removed it from the pan. It’s sweet, citrusy, and would be really great for Christmas dinner or breakfast the next day, especially with some coffee.

Perhaps cornmeal pancakes will be next…

Cranberry Cornmeal Cake
From Food Network’s Website
Serves: 6 to 8 servings

Ingredients
3/4 cup (1 1/2 sticks) unsalted butter, at room temperature, plus extra for the pan
1 cup all-purpose flour, plus extra for dusting the pan
1/2 cup yellow fine cornmeal
1 teaspoon baking powder
1/8 teaspoon fine sea salt
1/4 cup orange zest (from 2 large oranges)
3/4 cup dried cranberries, chopped into 1/4-inch pieces
1 1/4 cups sugar
1/2 teaspoon pure vanilla extract
4 large egg yolks
2 large eggs

Directions
Put an oven rack in the center of the oven. Preheat the oven to 350 degrees F. Butter and flour a 9-inch round cake pan.

In a medium bowl, whisk together the flour, cornmeal, baking powder, salt, and orange zest. Measure 3 tablespoons of the flour mixture into a small bowl. Add the chopped cranberries and toss until coated. Using a stand mixer fitted with a paddle attachment, beat the butter and sugar on medium speed until light and fluffy, about 2 minutes. Beat in the vanilla extract. Add the egg yolks and whole eggs, 1 at a time. Gradually add the flour mixture and mix until just incorporated. Using a spatula, gently fold in the cranberries.

Pour the batter into the prepared cake pan and smooth the surface with a spatula. Bake until the cake is golden brown, and a cake tester inserted into the center of the cake comes out clean, about 40 minutes. Cool for 20 minutes. Remove the cake from the pan and transfer to a wire rack to cool completely.

Swing Set Cardigan and other things

I love crocheting. I love taking yarn and turning it into something useful, especially when that something useful is also beautiful. I’m a big girl, so I never get to crochet anything for myself – it takes too much yarn – but that’s why I love crocheting baby and kids’ clothing. Unfortunately, I don’t know many people who actually have babies or kids – at least not people who would truly appreciate such gifts…and let me tell you, nothing is more frustrating or hurtful than spending hours, days, weeks, on something and having someone toss it aside as if you bought it at Walmart… Or worse, returning it – Which has happened. Seriously.

I was so happy when I heard one of our family friends is having a girl. It’s not that I don’t like creating things for boys, it’s just that it seems like the vast majority of patterns put there are for girls. And let’s face it, girls’ stuff is usually cuter. So lately, I’ve been diving into making a bunch of stuff for this new baby. I made a cute diaper bag, two burp cloths, and a changing pad out of an adorable pink, green, and white butterfly-themed fabric. I had a hell of a time finding all the fabrics for my projects, and even then, couldn’t find the damask pattern I really wanted. But I think everything turned out super cute.

20131020-203002.jpg
I also made a gorgeous granny blanket out of Bernat Waverly Baby yarn in lavender, honeydew, and peek-a-blue. I figured I’d used enough pink already, so I wanted to use colors that were a little less… Girly and submissive (I.e. Less pink). But, I then returned to the pink and made a cotton crocheted bib with green trim, but I’m still lacking a button for that one.

You can find the info for the granny blanket and scalloped trim on my Ravelry page here, or for just the granny blanket here.

Finally, I made a gorgeous “Swing Set Cardigan” from the book Little Crochet: Modern Designs for Babies and Toddlers, by Linda Permann (I’m also in her Craftsy class, which is awesome). The book is full of cute clothing and toys for babies and little kids. Unfortunately, the one little boy I’ve been wanting to make a sweater for is a little too old for these patterns, but I’ll find something eventually. I used NitPicks’ CotLin yarn in celery, which is a lovely soft green color (if you couldn’t tell yet, green is one of my favorite colors). I still need to add three mother of pearl buttons, but it’s otherwise finished. And what’s great is that I made the 18-30 month size, so this will be perfect for a future gift.

image_medium2-1

image_medium2

My next project is going to finally be something for myself – not a sweater, as much as I’d like, but a Hobbit Hood. I have some leftover light brown yarn from making my husband’s beardy, so I’m going to use it to make this hood. I just wish it had an optional cape attached to it, but perhaps I can make another one at some point and try to improvise.

Speaking of capes… The book I linked above has the most adorable hooded cape in it. I plan on making that sometime in the future when the baby girl is around 3 or 4. I don’t see much of a point in making it for infants who can’t even walk yet as the cape would just drag on the floor. Plus, how cute would it be to send her off to kindergarten in a red hooded cape?

Double Chocolate Almond Frangipane Muffins

20131020-193315.jpg
A few weeks ago, I had the full intention of making one of my favorite desserts – a pear frangipane tart from Smitten Kitchen. I made double the amount of frangipane because I love the creamy almond filling and I figured if I had some left over, I could do something else with it.

Well, a bad sinus infection and overall not sleeping well left me with all the frangipane filling because the tart never got made. I had been wondering the whole time if I could use frangipane filling in things like muffins much the way people use cream cheese filling. I had looked for a recipe like this online and found nothing, so I’d have to improvise.

So today, I finally got around to trying it. I started with a slightly revised version of KAF’s chocolate breakfast muffin, which tastes like a cupcake, but isn’t quite so delicate. I just added a little almond extract to the batter. I then used a teaspoon sized scoop to plop a scoop of my frangipane filling on top of each muffin. Baked for 25 minutes and voila… Moist, very rich and chocolatey muffins with delicate almond filling.

Chocolate Almond Frangipane Muffins
Slightly adapted from King Arthur Flour’s Chocolate Breakfast Muffins
and Smitten Kitchen’s Pear and Almond Tart

Ingredients

1 3/4 cups (7 1/4 ounces) Unbleached All-Purpose Flour
1 1/4 cups (9 3/8 ounces) light brown sugar
1 teaspoon baking powder
3/4 teaspoon espresso powder or 1 1/2 teaspoons instant coffee
1 teaspoon baking soda
3/4 teaspoon salt
1 cup (6 ounces) chocolate chips
2 large eggs
3/4 cup (6 ounces) milk
1 teaspoon vanilla
2 teaspoons almond extract or emulsion
2 teaspoons vinegar
1/3 cup (2 3/8 ounces) vegetable oil
1/2 batch of almond filling (see below)

Preheat the oven to 350°F. Line a standard muffin pan with paper cups or spray each cup with nonstick spray

In a large mixing bowl, whisk together the cocoa, flour, sugar, baking powder, espresso powder or instant coffee, baking soda, salt and chocolate chips. Set aside.

In a large measuring cup or medium-sized mixing bowl, whisk together the eggs, milk, vanilla, almond extract, vinegar, and oil. Add the wet ingredients to the dry ingredients, stirring to blend until dry ingredients are moistened.

Scoop the batter into the prepared muffin tin, filling nearly to the top. Place a rounded teaspoon-sized amount of filling on top of each cup of batter.

Bake the muffins for 25 minutes, or until a cake tester inserted in the center of a muffin comes out clean (test two or three muffins to make sure). Remove the muffins from the oven, and after 5 minutes remove them from the pan and allow to cool for 15 minutes before eating. Yield: 12 muffins.

Almond Filling

2/3 cup almond flour or ground almonds (NOT almond butter)
1 tablespoon all purpose flour
7 tablespoons sugar
6 tablespoons (3/4 stick) unsalted butter, room temperature
1 large egg
1/2 teaspoon almond extract

Combine almonds and flour in processor. Mix in 7 tablespoons sugar, then butter and extract. Blend until smooth. Mix in egg. Transfer filling to medium bowl. Cover and chill at least 3 hours. (Can be made 2 days ahead. Keep chilled.)

*Leftover filling can be kept for a few weeks. I’d imagine you could use this for many things – even using it for a filling in morning buns or sweet rolls. Encase a tablespoon of filling in bread dough, let rise, and bake as you would buns. Or use in place of cinnamon roll filling. Maybe even on toast – spread a layer of filling on thick challah or brioche and bake for a few minutes until toasted slightly.